by Linda | Feb 6, 2013 | DIY printables

The Pixel and Paper Series highlights digital techniques and products for scrapbookers like you and me. I believe that everyone should consider digital elements to be a part of their scrapbooking toolbox, so let’s learn together what the possibilities are. Each week, I’ll be sharing the opinion of a real-life scrapbooker to reveal how they use digital in their scrapbooking. Each post will also offer a freebie download to help you get started on your pixel and paper journey. Enjoy!
Introducing… Amy Tan
 Well known in the the industry – from fashion designer to scrapbooking role model – Amy is a product designer with American Crafts. She’s so inspiring, always sharing her colorful, happy memory keeping adventures. You’ll find lots of inspiration on her blog, from scrapbooking layouts, minibook inspiration, her travels and lifestyle, products and of course, her dogs!
I’ve always been inspired by how freely Amy scraps, embracing her own unique style and also scrapping on the go… to capture all those precious moments in her life.
Amy says:
I absolutely think technology goes hand in hand with papercrafting. Love that we are so connected through our digital lives – from taking and sharing our digital photos to printing them out and making mini albums with our hands. Whether you choose to scrapbook digitally, traditionally, or hybrid, we can all use technology to help us document our lives.
Take Advantage of Technology
I think the big take away from Amy is about taking advantage of the technology we have available to us today. For those who are loyal paper scrappers, going digital doesn’t mean abandoning your paper stashes. It’s really about adopting new tools to make your scrapbooking easier and more fun… and perhaps more integrated into your daily lives.
How many of our photos these days come from our phone? Now we are able to catch moments that might have been too fleeting in the past, when you couldn’t whip out your camera in time. I’ve also recently discovered the beauty of connecting Dropbox to my smartphone. It’s free and every photo you take syncs back to your Dropbox. No more accidental loss of photos and immediate access on my computer for printing and posting. How amazing is that?
Amy uses digital designs in her Project Life scrapbooking along with lots of real-life products that she loves. Digital is simply another tool.
 via Amy Tan blog
Probably the most representative technology booster that Amy uses is printing photos on the go and adding them into her travel minibooks. She designs many daybooks that you can purchase and she prints her photos with a portable printer she brings along during her travels. Talk about instant scrapbooking!
 via Amy Tan blog
I think that Amy is a great example of how someone can love technology and be totally immersed in it, yet still be a full blown paper scrapbooker. It’s this hybrid mix that I think many of the younger generations are growing up into. Digital tools are ingrained in our society, but that doesn’t mean good old fashioned scrapbooking and memory keeping can’t be married with it.
Try It For Yourself
Think about how you can take advantage of technology for your scrapbooking journey. Are you using your phone photos and taking snapshots on the go? Are you able to scrap on the go or use digital tools to journal and keep those details that we so often forget about?
I’ve designed a set of journaling cards that are great to keep handy in your purse! The idea is to jot down that quote, that memory, that little note that you don’t want to forget. Don’t forget to take a snapshot with your phone as well, to accompany the memory and I really do recommend connecting Dropbox to your phone. It’s been one of the best things I’ve done for my scrapbooking! Enjoy!

Download BTP_EasyJournalingCardsSampler
If you like printables, be sure to sign up for my email newsletter for new designs, links to freebies and the latest from yours truly.
by Linda | Jan 30, 2013 | DIY printables
The Pixel and Paper Series highlights digital techniques and products for scrapbookers like you and me. I believe that everyone should consider digital elements to be a part of their scrapbooking toolbox, so let’s learn together what the possibilities are. Each week, I’ll be sharing the opinion of a real-life scrapbooker to reveal how they use digital in their scrapbooking. Each post will also offer a freebie download to help you get started on your pixel and paper journey. Enjoy!
Introducing… Elise Blaha Cripe
 A blogger, scrapbooker and designer, Elise is definitely a known name in the scrapbooking industry. I’ve been following Elise’s blog for quite some time and love how she shares so many aspects of her creative life, not just scrapbooking. I think of it as living a creative life and she’s also a great example of someone without kids who scraps a lot – even though she’s currently expecting! The news actually made me feel closer, because I’m also expecting my first child and it’s wonderful to read and share in our life experiences. Although Elise is a paper scrapper, she’s a designer as well who most recently designed the seafoam edition (Amazon link) for Project Life. She also runs her own shop and definitely uses digital tools in her crafty work and lifestyle.
Elise says:
My only digital tool at the moment is Photoshop Elements, and I am actually very happy with it. I use my computer to edit, resize and crop photos for printing almost everyday. I also create, with PSE, graphics that I print and use in my Project Life album (the quote cards are a good example of this) and I sometimes add text elements directly to the photos before printing.
I consider myself a paper scrapbooker because I like to put it all together “in real life” but I cannot imagine not using digital in some form or another for almost every project I do. 🙂
Project Life – Paper and Digital
For those who are into Project Life scrapbooking – whether the full system or taking some of the styles and ideas – digital tools are really indispensable. Elise uses digital titling, journaling, printing of quote cards and various designed cards for her Project Life and really shows how easy it is.


via Elise’s blog
Designing for yourself doesn’t have to be super complicated or fancy, sometimes it’s just text or beautiful usage of typography. I really love Elise’s clean style.
- Consider creating your own journaling and designed cards with quotes or existing imagery/graphics that you can readily print out
- Don’t hesitate to caption or title right on top of your photos
- Don’t forget that anything you see online can be printed out and used in your scrapbooking, take advantage of this!
Photo Editing
Digital photo editing is also a tool in Elise’s arsenal and I think sometimes we don’t take advantage of all the possibilities! Now that everyone has a smartphone, it’s easy to do on the go as well, so you won’t be spending all your time in processing photos. Apps like Instagram and Afterglow have made it super easy to tweak your photos. There are a multitude of actions that can be loaded into Photoshop as well, to give your photography a boost. Ultimately, making a small effort can really help to enhance your photography immensely. Elise wrote a post with tips on taking self-portraits and I think it offers great insight.

via Elise’s blog
- Try using your smartphone and all the latest apps offered to enhance your photography on the go
- Explore Photoshop actions available for to apply premade effects to your photos with a click
- Consider what a difference it makes to add titling, journaling, stamps and other graphics on top of your photos before printing
Try it for yourself
The take away is to remember how much power we hold in our hands these days with the technology available. With just a little effort, we can make a big difference in our memory keeping and it doesn’t have to be fancy or complicated at all.

To start you off this week, I’ve designed a journaling card that would be great for Project Life, but also on a traditional layout as a designed embellishment. In 4×6 size, you can use it as a title card or size it down for other pocket sizes – both horizontal and vertical versions. Hope you have fun using a little digital in your memory keeping this week.
Download BTP_HelloLifeCardSampler
If you like printables, be sure to sign up for my weekly newsletter for new designs, links to freebies and the latest from yours truly.
by Linda | Jan 16, 2013 | DIY printables
The Pixel and Paper Series highlights digital techniques and products for scrapbookers like you and me. I believe that everyone should consider digital elements to be a part of their scrapbooking toolbox, so let’s learn together what the possibilities are. Each week, I’ll be sharing the opinion of a real-life scrapbooker to reveal how they use digital in their scrapbooking. Each post will also offer a freebie download to help you get started on your pixel and paper journey. Enjoy!
Hello blog friends and new visitors!
 My name is Linda Tieu and I’m the little lady behind this blog, BackToPaper. I thought it was only right for me to kick off this series by sharing how I use digital as tool in my scrapbooking.
I’ve always considered myself a hybrid scrapper, because I create using both digital and paper. There was a time when I felt as if I had a scrapbooker’s identity crisis. Where did I fit in? Was I part of the digital crowd or paper crowd? I couldn’t be just one or the other and realized in the end that there was no need to choose. I am free to scrapbook in whatever way I choose given the project at hand and definitely find myself relishing the freedom of using pixels and paper.
There’s no doubt that I love the tactile feel of paper in my hand. The texture and dimension of having real layers and embellishments in my projects caters to my crafty side. I could not live without it. I also feel that it’s easier to share with friend and family when I have a physical album to show off to them, especially for older generations that simply don’t like the digital presentation of photos and layouts.
By sharing some of the ways I use digital for my scrapbooking, I hope to inspire you to try out some new techniques and methods. Expand your scrapbooking toolbox and most of all – have fun!
Photobooks & Photocollages
Oftentimes for big projects, events and vacations, I scrap everything into a digital photobook instead of individual paper pages. It’s the fastest way for me to compile a mass quantity of photos and keep it all the same style and theme. There’s huge cost-savings because digital supplies can be reused as many times as you want, you don’t have to buy x number of copies and you won’t run out of e’s in your alphabet stickers!

From my wedding and honeymoon to month-long vacations back to the USA – I’ve created and printed my photobooks through Blurb.com (affiliate link) for years. I like their imagewrap covers and premium paper selections. I often design everything from scratch as they allow print quality PDF uploads, but they also have services that are easy to use for non-designers.
I believe that photobooks are a great way to get all those photos together and printed, without having the pressure to create a full-on layout every single page. Those are usually too-big projects that never get finished anyway! I want to enjoy and share my photos asap… rather than have them pile up as another to-do on my list.
On the same vein, before printing my photos I sometimes photocollage them together. It’s so much easier to do this digitally, so you can take your time in cropping and arranging your compilation of photos. It’s really a superb way to get multiple photos into a layout. There are a variety of round-up and collage digital templates out there as well. Even if they are meant for digital scrappers, you could use them to just organize your photos. Then print and use the collage in your regular scrapping process!
Digital Titles
I’ve blogged before about creating titles digitally for my scrapbook layouts. You definitely save on all the alphabet stickers you would have to purchase and the styles out there are limitless. Using fonts to premade digital scrapbooking products…

Digital Embellishments and Elements
Since I design digital products, I most definitely use digital embellishments and elements in my scrapbook layouts. It’s like making your own products yourself and a pop dot here or there will instantly turn an image into a multi-dimensional embellishment. Most scrappers who purchase digital kits are purely digital scrappers. But I feel that those same kits can be really useful for paper scrappers as well. You can print your own background paper, create your own embellishments from digital elements and most definitely print journaling on cards and inside frames.

Multiple Copies and Digital Files
Finally, we all know that when multiple copies are required, digital really helps out. With a digital file you can send it instantly to anyone in the world with an Internet connection. When you want to distribute the work, you can print multiple copies and it’s often a lot of money saved than creating another paper version entirely. I have actually created 7 copies of a particular family albums to distribute and although I loved the results, it was a huge amount of work, supplies and time spent. If I would have done it digitally, I wouldn’t really have lost any quality at all!
Suffice to say that there are many advantages to the digital format. How do you use digital in your scrapbooking process?
To get you started off this week, check out the freebies section and feel free to use all the digital downloads I’ve offered thus far. I hope you enjoy, have fun and discover some new advantages of using pixels and paper. As this blog is titling, I’m all about bringing digital, Back To Paper!
by Linda | Mar 13, 2012 | my creative journal

Many people think of the conservation and preservation of fine art prints, but I want to challenge you to involve yourself in the creative expression and USE those prints. Since offering my Girls With A Message as downloadable printables, a lot of project ideas have opened up for me. I think that involving yourself in the art, not just admiring… brings you into the process and message. I think it’ll mean more, because you’ve put your unique touch into it.

I decided to decorate and embellish my art print, adding that glam that makes me smile with delight. I printed my artwork on photo paper, then printed just the bow of her hair onto cardstock and cut it out. BTW, see the color difference between photo paper and regular cardstock prints below?

I took that cut-out bow and covered it with some pink tinsel glitter – super glam and girly! I love it! Funny how it fits onto the magazine page image that I was using as scrap paper under. She looks mysteriously glamorous…

When my embellishment was completely dry, I put a bunch of foam tape on the back, so that I could attach it on top of my full print.

Working on a separate piece of cardstock means that I can experiment a bit, without directly working on my art print. It also adds an extra 3D pop effect and if you used temporary adhesive, you could probably switch out different decorations as well.

It’s a simple decorative element, but adds so much to the life of the print. A personal touch that makes me look and smile.

How can you decorate and embellish up your 2D images? Add some glitter, pop-up elements, put real earrings on her ears… it’s up to your imagination. Have any ideas to try out?
by Linda | Feb 28, 2012 | my creative journal
I know that when it comes to digital printables, most are worried about the process of printing at home. We want the best quality possible, but very few of us have professional heavy duty equipment! I admint that the process of printing seems to be a whole art form in itself! However, these days the technology available to us gives pretty fabulous results… and many independent artists selling art prints, actually print at home as well. Regular home printers are pretty darn good and I’m able to get really great quality prints with ease.

Most of us are able to print a quick photo at home with our inkjet printers and it works the same for art prints and other downloadable printables as well. There are many factors that contribute to a beautiful looking print and with a bit of testing and experimentation, I’m certain you’ll find what is acceptable to you – for your particular use at that time.
YOUR PRINTER
To print at home, you obviously need access to a printer. Most of us have inkjet printers…the most common for households these days. They have a lot of features and the trick is to inform yourself of what is possible. Of course, the more expensive the printer, the more quality and control comes with it. Artists in the business of printing their own artwork usually have large format printers that accept thicker, speciality papers. They usually have more control over their ink colors as well – 4 to 8 different ink cartridges. It can provide better picture detail and color quality.
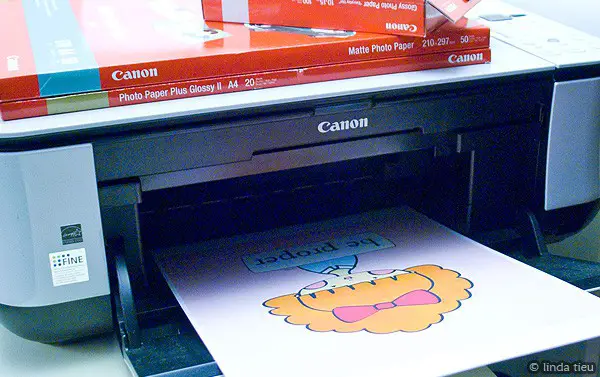
I personally have a very inexpensive “home office” Canon PIXMA MP240. It’s nothing special, but does give me a lot of flexibility when it comes to borderless printing at any custom size. It’s not the best out there, but the quality is pretty darn good and more than anything, it’s about understanding how to maximize my printer’s potential. Let’s use and make the best of what we’ve got!
INK
An extremely important aspect for me, is to use ink from the same brand as my printer. I know that it costs and might seem like all the same thing in the end. But if you think about it, there’s a compatibility when you use products from the same company – whatever that company might be. They test and use their own products, so that it works together. When they claim that pigment ink can last up to 100 years, it’s on their paper and using their ink.
I personally don’t know if the generic brands are really the same thing chemically or not. However, instead of fussing around with injecting refills which I abhor doing… I always go with the name brand. I think it’s totally worth it and makes a difference. There are exceptions I’m sure and I think the only way to go is to test and see what works for you at the best price.
PAPER
Another major component in the quality of your print is the paper choice. In fact, I think it’s a pretty HUGE deal. I use Canon brand papers with my Canon printer, but sometimes opt for other professional papers as well. The key here is professional. There is a huge difference. Just do a comparison. Print on regular paper, on photo paper, on canvas, different brands, etc. You will see the difference in vibrance of color when printing on regular cardstock versus photo paper. Perhaps you can see in this photo how much more bright and true to color the top sheet is – matte photo paper, versus the bottom which is regular cardstock – same printer centers. It’s about how the paper absorbs the ink.

The bottom sheet looks completely washed out by comparison, right? And no, my printer was not running out of ink, I actually printed on the cardstock first and realized my mistake! The reason why photo paper looks so much better is because it’s manufactured to capture vivid and bold colors. The ink doesn’t sink down and become absorbed by the paper and fibers. That’s why there’s always a right side to print on and the back side, has their logo and looks dull. I also print on high resolution paper that is much brighter white to begin with – ever realized how dull and yellowish regular copy paper looks? That aspect also makes a difference in your end product.
Your best bet is to print test prints on the different types of paper you have. Just print a tiny 1inch by 1inch square, something large enough so you can compare with perhaps a crop or graphic that has different colors. You’ll see the difference in how your paper takes your ink and can make a judgement from there. Obviously, for whatever budget you have, get the best quality you can afford and go with that.
SETTINGS
A huge tip when printing from home is to set your printer settings on the best quality possible. There is a noticeable difference between high quality and standard quality in my experience. Some people don’t use the high quality because it uses more ink, so you just have to do a bit of testing and see what is acceptable for you.
Selecting the specific paper you are using also makes a difference. If you think of a putting a puzzle together, when you have all the right settings, your image will look great. When you don’t have them matched up properly, it can be off. Dig into the printer menu and settings! Look through everything and understand what options your printer has.

I usually print directly from the preview image program on my Mac – simply because I prefer the menu options. Of course, you can print from any graphic program and simply open up your printer settings specifically.
Things to check:
- What are you printing, how many copies? Consider doing a test first! Can you see a preview?
- Select your proper paper size
- Select the proper sizing for your image – do you need to scale it down? (my girl art prints are 10″x10″ at 300dpi, so you usually will be sizing them down. the even number makes it easy to just enter percentages for whatever size you are going for, 50% for 5″x5″, etc)
- Select the proper paper type – it makes a huge difference!
- Select the highest print quality possible

I have certainly run into problems myself when printing at home, but I know from experience that it simply took a bit of education and experimentation to find the sweet spot. When I tried all the Canon products together, my prints looked pretty fabulous! In fact, I have upgraded and use even the super thick fine art museum etching paper – and WHOA it makes a huge difference!

So give printing at home a try and know that it takes just a bit of experimentation to maximize the use of your printer. These days, the quality is really fantastic.
I should note that if you aren’t satisfied with the quality at home, you can always send the image to a profesional printer or even a photo printing service. Anything printed as photo quality looks significantly better!
Let me know if you have any tips and tricks for printing beautiful artwork at home. How you find the process of printing at home? I know that with different equipment and materials, we will all get different results. I also know that some artists cringe at the thought of letting others control the quality of their work. However, I want my girls to spread far and wide and I want people to see them and feel better seeing them! Even if it’s maybe not that vibrant of a print, I don’t think it degrades the worth of the original work and idea. I think that the power of the visual imagery and message, still carries through. So although it’s wonderful to see the high quality prints, I think the not so professional copies still have just as powerful effects. I suppose that in this digital age, it’s no longer about that physical tactile item sometimes. It’s much greater and intangible…